
How to configure Automated Storage Tiering using Microsoft Storage Spaces
- Guidance
- December 21, 2023
- Download as PDF
Description
In case of using Automated Storage Tiering, the individual spinning disks and flash drives can be either connected into OS directly in Pass-Through mode or preconfigured into separate virtual “SSD” and “HDD” LUNs, and then attached into the host OS.
NOTE: Please make sure that the final configuration which is expected to be put into production is fully supported by either the software vendor (i.e., StarWind, Microsoft, VMware, etc.) or particular MSP/ISV who is in charge of the whole project. Please ensure that specific workload expectations can be met with both existing and future deployments. Depending on the configuration it can be either self-supported, partially supported, or fully supported.
NOTE: Simple Tier has no redundancy built-in, so in case of either individual spinning disk and/or flash drive failure there is a risk of losing the data. It is recommended to configure resilient storage to be used as the underlying storage for the Tier. Please make sure that such a configuration is supported by either the software vendor (i.e., StarWind, Microsoft, VMware, etc.) or/and MSP/ISV.
Automated Storage Tier creation
There are two ways to configure Automated Storage Tiering. It can be done via Server Manager and via the PowerShell console.
The first level of Storage Tier is Storage pools. At this level, separate physical disks are united into a single pool, providing the ability to flexibly expand the capacity and delegate administration.
The upper level is Storage Spaces. At this level, virtual disks are created using the available capacity of a storage pool. Storage Spaces feature the following characteristics: resiliency level, storage tiers, fixed provisioning, and precise administrative control.
1. Launch Server Manager->File and Storage Services->Volumes->Storage Pools. All disks available for Storage Pool are listed in Physical Disks. Click New Storage Pool.
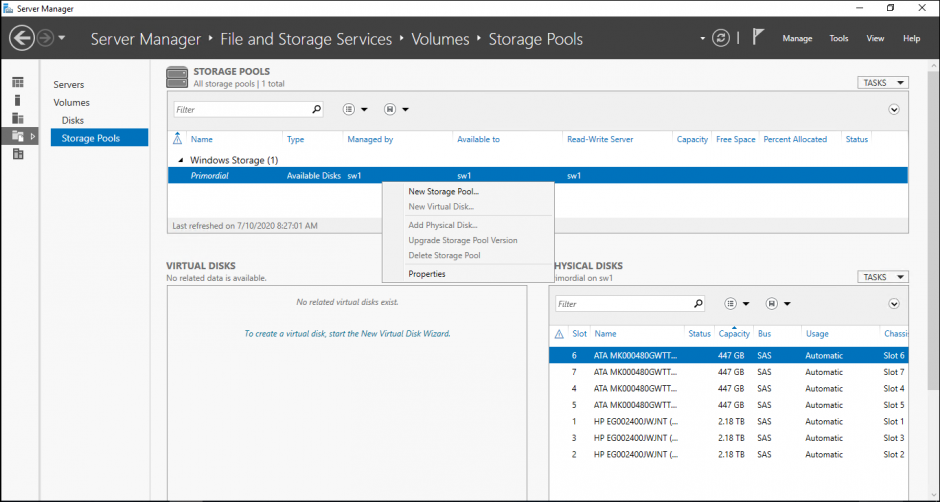
NOTE:
Get-PhysicalDisk
is a PowerShell command that allows checking the disks available for Storage Pool.
Get-PhysicalDisk | sort-object SlotNumber | select SlotNumber, FriendlyName, Manufacturer, Model, PhysicalSectorSize, LogicalSectorSize | ft
is a PowerShell command that allows checking the parameters of physical disks.
2. Specify a Storage Pool name:
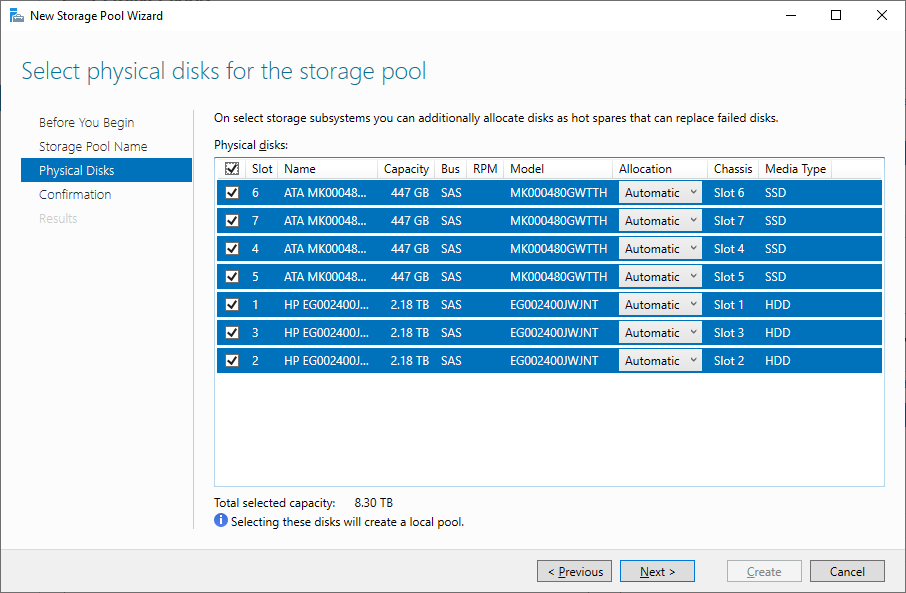
3. Select the disks for Storage Pool and then press Next. In case of using Storage Tiers with both SSDs and HDDs, all these disks need to be added into the Storage Pool.
4. Confirm the correct settings and click Create to create Storage Pool.

NOTE: There might be cases when the MediaType parameter should be changed manually. It can be done with the following PowerShell commands:
Assign SSD MediaType for the disk with size less than [ ]GB:
Get-PhysicalDisk | where Size -lt [ ]GB | Set-PhysicalDisk -MediaType SSD
Assign HDD MediaType for the disk with size more than [ ]GB:
Get-PhysicalDisk | where Size -gt [ ]GB | Set-PhysicalDisk -MediaType HDD
Additionally, the following commands can be used:
Get-PhysicalDisk | ft FriendlyName,CanPool,Size,MediaType
Set-PhysicalDisk -FriendlyName [disk name] -MediaType [SSD or HDD]
or
Get-PhysicalDisk | ft FriendlyName,CanPool,Size,MediaType
Get-PhysicalDisk | Where Size -EQ [disk size] | Set-PhysicalDisk -MediaType [SSD or HDD]
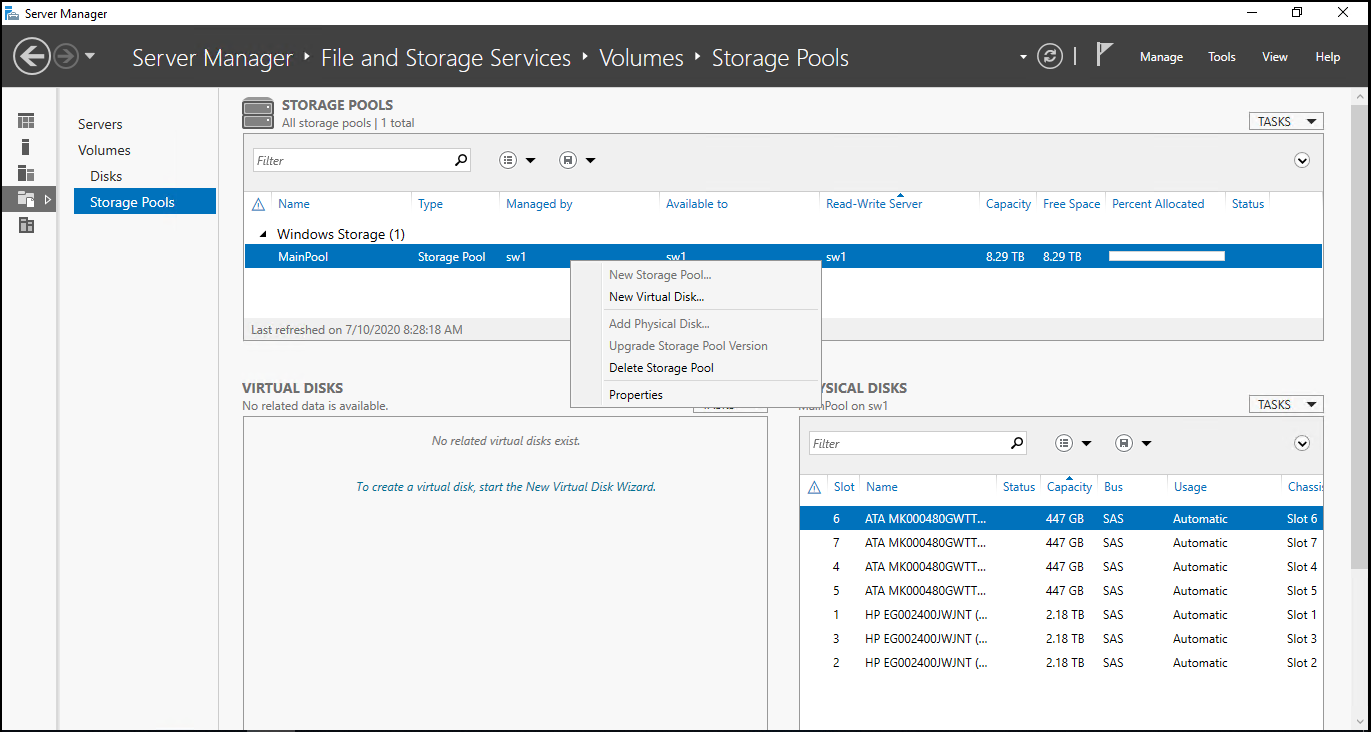
5. The next step is to create a virtual disk on the storage pool. It is possible to create multiple virtual disks that exist in the storage pool and then create multiple volumes that exist in each virtual disk. Create new virtual disk by right-clicking on the storage pool and selecting New Virtual Disk.
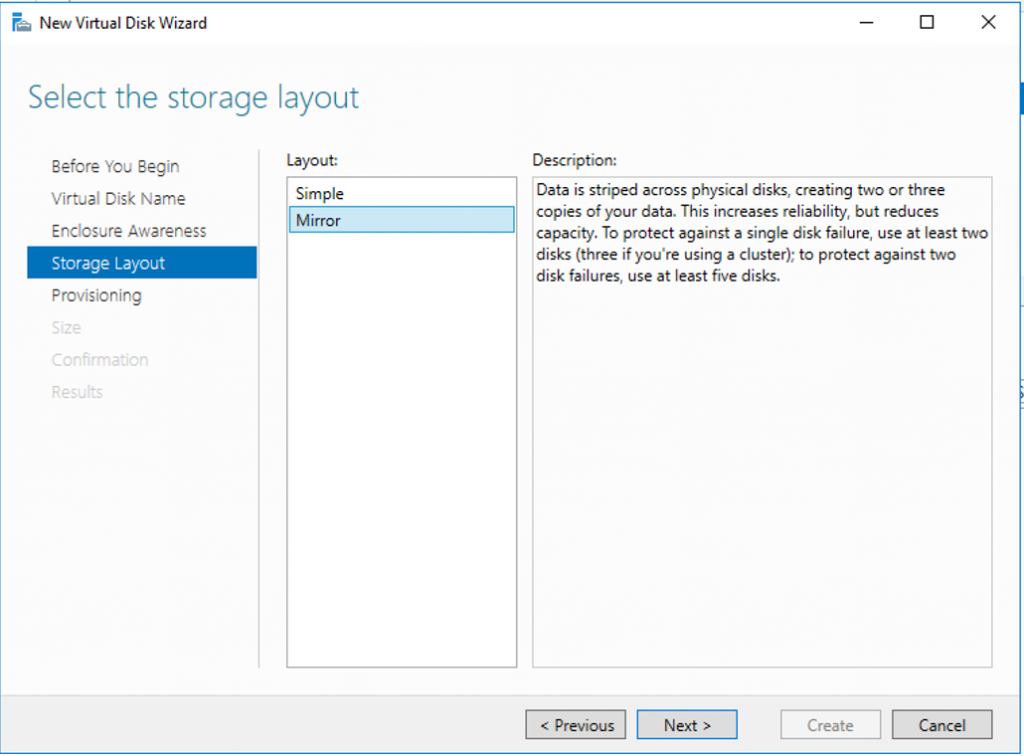
6. For Automated Storage Tiering, both HDD- and SSD-based disks or storage arrays should be in the storage pool to make use of Storage Tiers. In case of using Storage Tiers, Storage Layout can be only Simple and Mirror. Specify Virtual Disk Name and select Create storage tiers on this virtual disk.
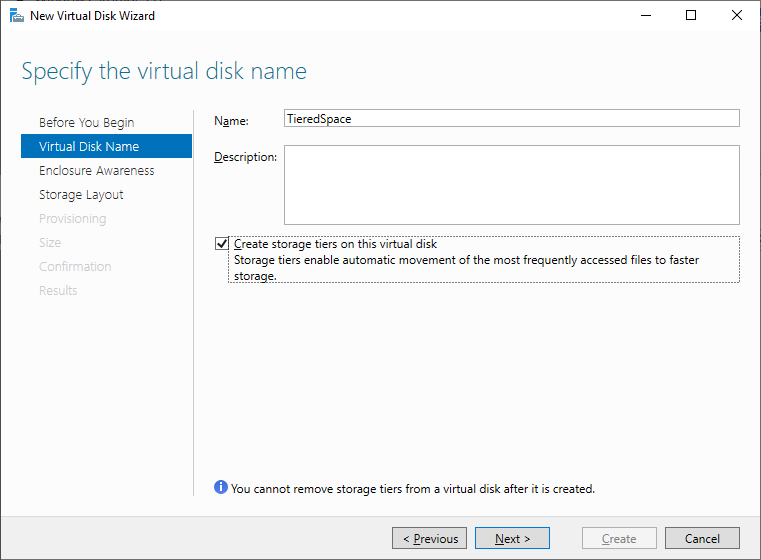
NOTE: Simple Tier has no redundancy built-in, so in case of either individual spinning disk and/or flash drive failure there is a risk of losing the data. It is recommended to configure resilient storage to be used as the underlying storage for the Tier. Please make sure that such a configuration is supported by either the software vendor (i.e., StarWind, Microsoft, VMware, etc.) or/and MSP/ISV.
7. Select the storage layout type. Under the Simple layout, the data is striped across physical disks. This would be equivalent to a RAID-0 configuration. In case of using at least two disks, the Mirror configuration can be configured. The Mirror is equivalent to RAID-1. Once done, click next.
8. Specify the provisioning type.
Fixed. This provision type means that virtual disk cannot exceed the actual storage pool capacity.
Thin. This provision type means that there is a possibility to create a volume with a size exceeding the storage pool capacity and then add physical disks later.
Choose fixed disk provisioning since this type is required by Storage Tiers. Click Next.
9. Specify the size of the Virtual Disk.
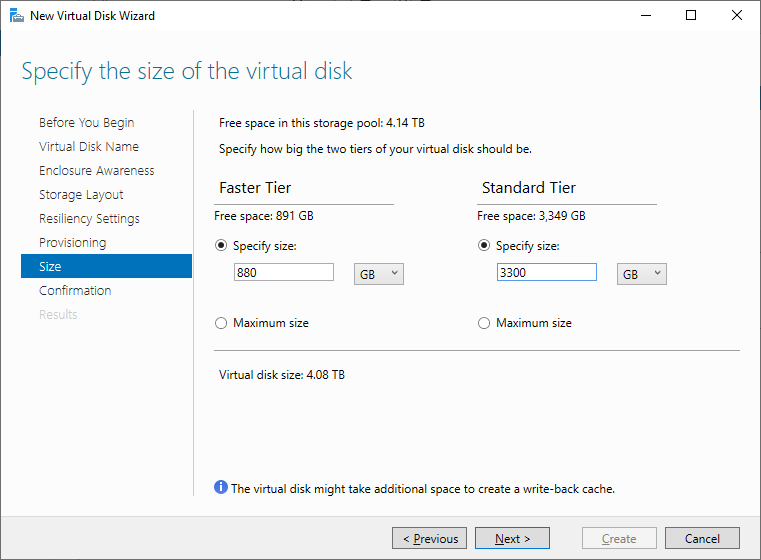
NOTE: At least 8 GB of free space on each Tier should be provisioned to allow Automated Storage rebuilding in case of the disk loss.
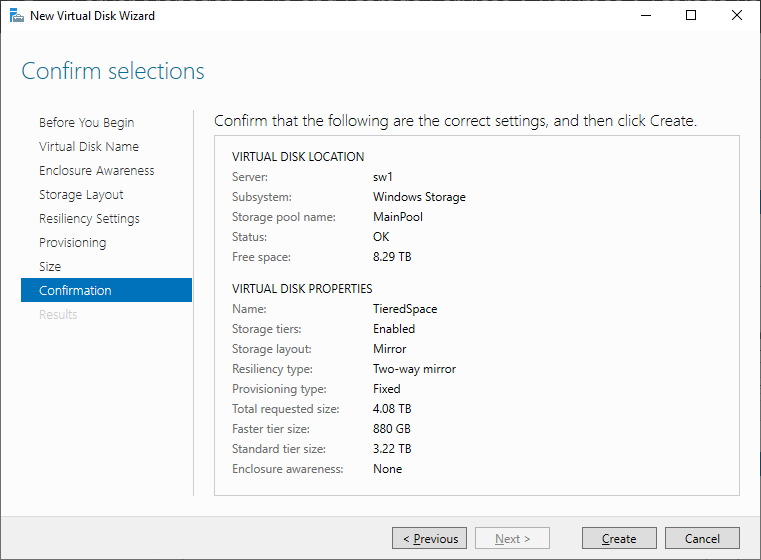
10. Confirm the settings and click Create to create Virtual Disk.
NOTE: In case of using both SSD and HDD disks or virtual LUNs, automated Storage Tier consists of the so-called “hot” and “cold” Tiers. Automated Storage Tier elaborates a data map taking into account how often the certain data is used, thus defining how hot separate data blocks are. During the process of optimization that is launched automatically every day, the hot data, i.e. data that is used on the most frequent basis, is transferred to the fast SSD tier, with the data used less frequently, the so-called cold data, being transferred to the slower HDD tier.
As the SSD tier-based data gets updated only once a day, it is possible to manually optimize it with the help of the following CMD one-liner:
defrag.exe /C /H /K /G
This command should be run on all cluster nodes, as it optimizes only those virtual disks the owner node for which is the one where the command is running.
For certain files, it can be optimal to permanently stay on the SSD tier. An example is a VHDX file that is accessed frequently and requires minimum latency and high performance. Such a result can be achieved by pinning the file to the SSD tier.
The following recommendations should be taken into account before running the command:
- the command should be run from the node owning the storage (Cluster Shared Volume) with the file stored on it.
- local path to the storage (Cluster Shared Volume) on the node should be used.
After a file is pinned, it will stay in the tier until the next optimization process triggered either automatically or manually.
To pin files to the SSD tier, run the following PowerShell command:
Set-FileStorageTier –FilePath <localFilePath> -DesiredStorageTierFriendlyName<ssdTierName>
To unpin files from the SSD tier, run the following PowerShell command:
Set-FileStorageTier –FilePath <localFilePath>
The below PowerShell command lists all files that are currently pinned:
Get-FileStorageTier –VolumePath <csvVolumePath>
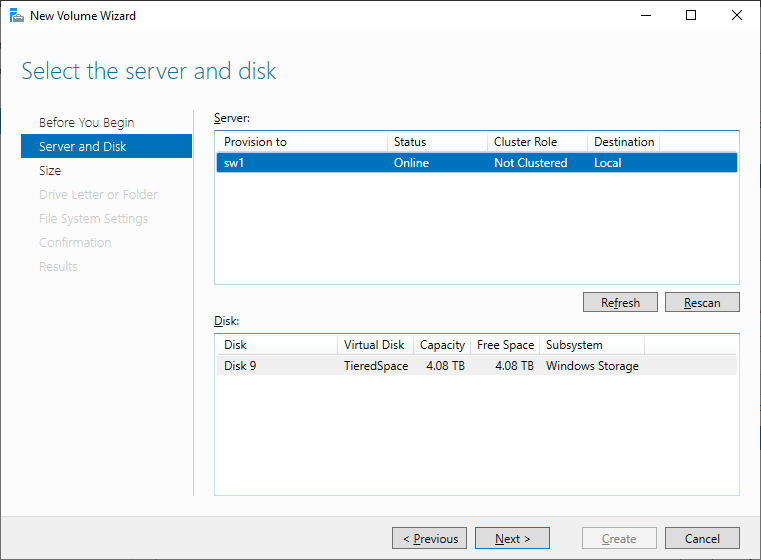
11. Create a New Volume using New Volume Wizard:
12. Select the server and disk and click Next.
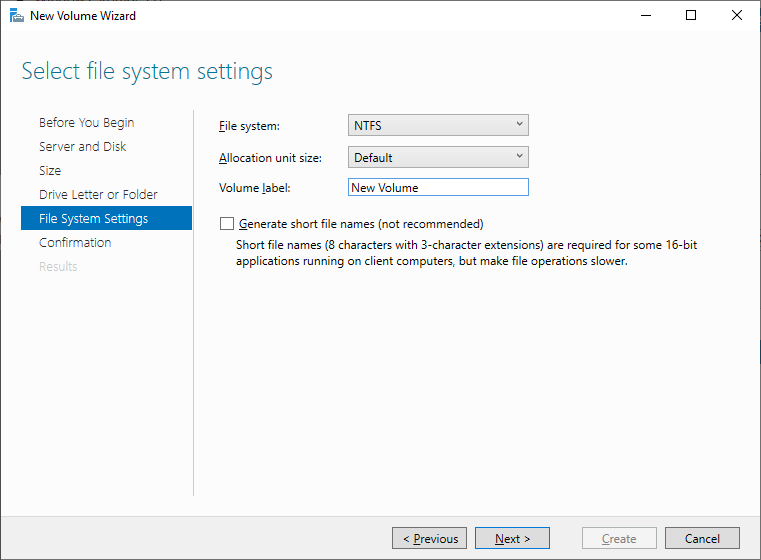
13. Select the file system settings and click Next to proceed.
NOTE: The steps described above can be performed with help of PowerShell commands. Also, with help of PowerShell, additional parameters can be configured for better performance:
Set 64K size of interleave: –Interleave 65536.
Set LogicalSectorSizeDefault 4096 instead of default 512.
The cache size can be changed with the help of –WriteCacheSize [ ]GB parameter. It is possible to set cache size only via PowerShell commands for creating Automated Storage Tier.
Set SSD tier in two-way mirror: ResiliencySettingName Mirror -NumberOfDataCopies 2
The number of threads can be set with -NumberOfColumns parameter. The recommended number is the number of SSDs divided by 2.
Disclaimer: StarWind Support does not write scripts on demand. Custom script troubleshooting is not supported. The script provided in this article is as an example and can be customized by the end-user according to his needs.
The example of the PowerShell commands for Storage Pool and Virtual Disk with Tiered Storage creation is provided below:
Get-StorageSubsystem – check the storage subsystem name before running the commands below.

Get-PhysicalDisk

$disks = Get-PhysicalDisk |? {$_.CanPool -eq $true}

New-StoragePool -StorageSubSystemFriendlyName "[ ]*" -FriendlyName [ ] -PhysicalDisks $disks -LogicalSectorSizeDefault 4096

Get-PhysicalDisk | where Size -lt [ ]GB | Set-PhysicalDisk -MediaType SSD

Get-PhysicalDisk | where Size -gt [ ]GB | Set-PhysicalDisk -MediaType HDD

Get-StoragePool -FriendlyName [ ]

New-StorageTier -MediaType SSD -StoragePoolFriendlyName [ ] -FriendlyName SSDTier -ResiliencySettingName [Simple, Mirror or Parity] -NumberOfDataCopies 2 -NumberOfColumns [ ] -Interleave 65536

New-StorageTier -MediaType HDD -StoragePoolFriendlyName [ ] -FriendlyName HDDTier -ResiliencySettingName [Simple, Mirror or Parity] -Interleave 65536

$SSD = Get-StorageTier -FriendlyName SSDTier

$HDD = Get-StorageTier -FriendlyName HDDTier

New-VirtualDisk -FriendlyName "[ ]" -StoragePoolFriendlyName [ ] –StorageTiers $SSD, $HDD -StorageTierSizes [ ]GB, [ ]Gb -ResiliencySettingName [Simple, Mirror or Parity] -ProvisioningType fixed -WriteCacheSize [ ]GB
IMPORTANT NOTE: The virtual storage configuration created with PowerShell script must be reviewed by the software vendor (i.e., StarWind, Microsoft, VMware, etc.) for compliance and is fully supported and validated by either software vendor or MSP / ISV to satisfy and match the existing and future workload requirements and expectations of the specific production environment.
The operations specified in this section should be performed on each server.
